In this lesson we are going to add the audio, so a voice says the number when the correct carrot is clicked.
We added the sounds in lesson 3 and added the Audio function in lesson 3, so now it’s just a case of telling the system when to play the audio.
Set a New Audio Action
Click on ‘Add new action’ to add a new action and select ‘Audio’.
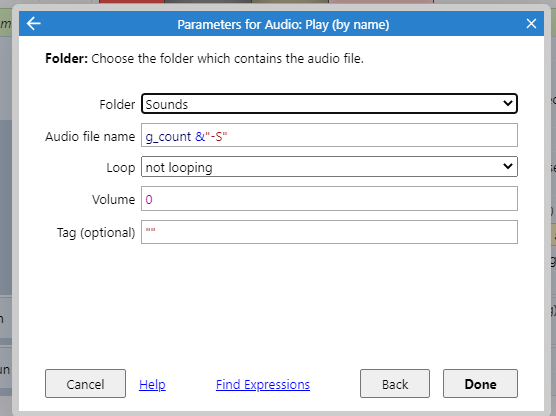
Choose ‘Play by name’. With this option we need to specify the name of the audio we want the system to play. Because we want the audio to play sequentially when the correct carrot is clicked, this is the best option to use.

Now we need to specify the name of the audio we want to be played.
If you take a look at the audio files we uploaded, you will see that they are named number -S (for example 2-S). Therefore, we can use g_count to play the correct number audio file.
Set the audio file name as g_count &”-S”
This is telling the system to play the audio number g_count with -S appended to it – for example 1-S which is exactly as the file name is written.
You don’t need to worry about any of the other settings. For reference, when the sound is shown as 0, that means it will play at the volume the audio file was created at with no increase or decrease to the sound.

Now, when you preview the project, you will hear the correct number spoken when the carrot is clicked.
IMPORTANT: In order for the sounds to play in the correct place, the Audio action must be beneath the action which adds 1 to g_count.
Your event sheet should now look like this:


