If you want to make educational computer games a little more fun for little learners, why not record and add your own voice! Many of our beginner video games here at Edugamery have audio content which is easy to change.
Whether you are a parent looking to make the most of screen time or a teacher wanting to create a unique experience for your students, it’s very easy to update our beginner educational video games with your own voice.
Don’t worry, you don’t need a fancy studio or lots of specialist equipment! You can make a recording of your voice using your computer, phone or tablet and then use free audio editing software to prepare the files for the game.
Why Add Your Voice to Educational Computer Games
One very good reason to add your voice to educational computer games is it helps little learners really connect with the content of the game. They are familiar with your voice, and instead of hearing some stranger, they are hearing you!
It’s also a great way to teach another language. In any of our counting games, for example, you can easily swap out our audio (which features kids counting 1 – 10 in English) and replace it with you or another family member counting in a different language.
Take the game below – this is a simple tap and count game for very young learners. How cool would it be to replace our stock audio with your own. And how about adding a personal congratulation message at the end?

How to Record Your Own Voice For Educational Computer Games
In order to add your voice recordings to a game, you will need a separate audio file in MP3 or wav format. To do this, you will record a single recording of you, for example, counting from 1 – 10, and then use an audio editor to split the file. If you are familiar with all of this you can skip ahead to the end of this page, however, if this all sounded as clear as mud, read on 🙂
There are a number of ways to record your voice and most modern devices have built in microphones. Of course, if you have a plugin microphone you will get better results, but at a pinch, you can use your device’s built in device.
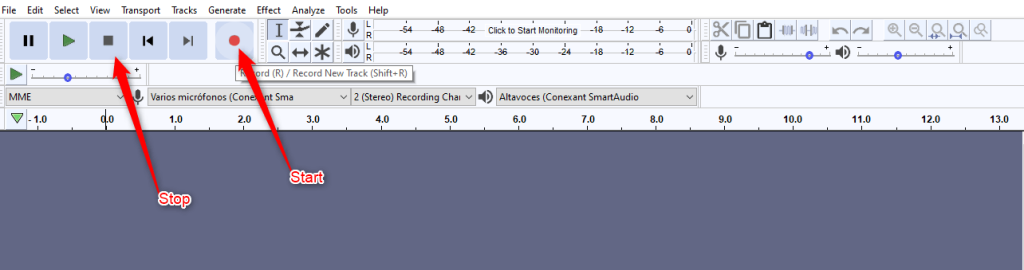
We will be using the free desktop app, Audacity, to edit the files ready to load to the game. As well as editing files, Audacity also allows us to record directly into the app, therefore this is a good way to go if you want to record from your computer.
You will see the record button and stop button at the top of the page.
If you want to record from your phone or tablet, you will need a voice recorder app. You may have one already installed on your phone or tablet, however you will find there are a variety of free and paid-for voice recorder apps in both the Apple and Android stores. We don’t need any fancy functionality, however we do need the ability to be able to export in MP3 or WAV format.
The two voice recorders I have used are listed below (however there are many different options available and these may vary depending on where you live):
Record Your Voice
When you are ready to record your voice, get ready to do so speaking slowly and clearly. It’s important to get the pacing right, so if you are recording the words for the numbers 1 – 10, space them out by silently saying ‘and’ between the words as follows:
one (and) two (and) three (and) four (and)…..
This will help give you an equal space between the words.
Add Inflection
Remember who’s going to be listening to this! Youngsters will enjoy hearing inflection in your voice and it will help them be enthusiastic if you sound enthusiastic! So let your inflection build as you go through the numbers with a celebratory note as you get to 10 or the last in the list.
Edit the File
If you have recorded your voice on your phone or tablet, transfer this to your computer read to edit.
If you have not already done so, download Audacity from the website and open it.
Open your audio file (File > Open) and you will see something like this:
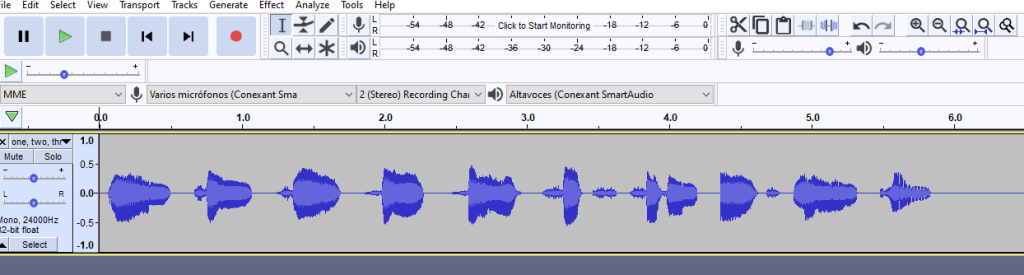
As you will see from the image above, we can see where the sound is and the areas of silence, therefore we want to split the file into separate files where there are periods of silence. This is easy to do!
Click CTRL A to select all, and then navigate to Tools > Analyze > Silence Finder.
Split The File
Something else you may want to do is to split the file. For example, if you have created a file with you saying the numbers one to ten, and you want to split that so you have ten individual files, each with one number.
This is straight forward to do:
1. Locate the Split Point:
- Open your audio file in Audacity.
- Use the zoom function to get a clear view of the waveform.
- Identify the point where you want to split the clip. You can either click directly on that spot or use the playback controls to find the exact location.
2. Splitting the Clip:
There are three ways to achieve this:
- Using the Menu: Go to Edit > Clip Boundaries. A submenu will appear. Choose Split to divide the clip at the current cursor position.
- Using Keyboard Shortcut: A quicker option is to use the keyboard shortcut. Press Ctrl + I (Windows) or Command + I (Mac) to split the clip.
- Using Right-click Menu: Right-click on the waveform at the desired split point. A context menu will pop up. Select Split Clip to perform the action.
3. Additional Options (Optional):
- Split to New Track: If you want the split section on a separate track, use Edit > Clip Boundaries > Split New. This creates a new track with the selected portion.
- Split and Delete: To remove the unwanted section after splitting, use Edit > Remove Special > Split Delete. This keeps the remaining clip and removes the selection.
4. Downloading Individual Files:
Once you’ve split your audio into separate clips, you can export them as individual files. Here’s how:
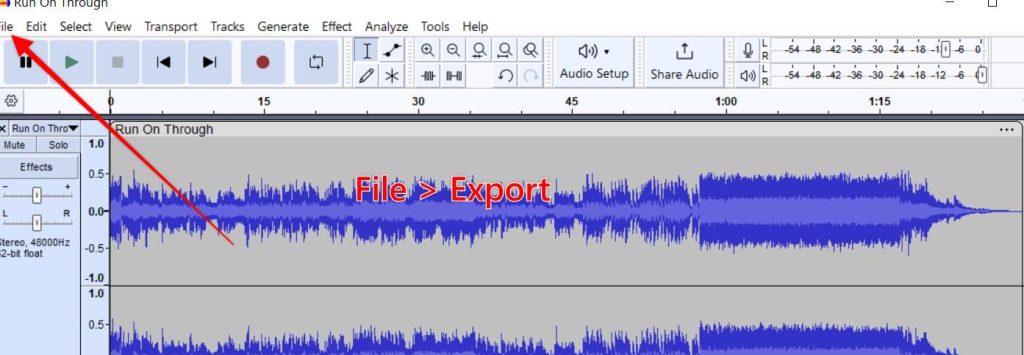
- Select the clip you want to export.
- Go to File > Export.
- Choose a desired format (e.g., MP3, WAV) from the “Export” dropdown menu.
- Click Browse to specify where you want to save the file.
- Give the file a name and click Export.
Repeat this process for each clip you want to download as a separate file.
By following these steps, you can efficiently split your audio clips in Audacity and export them as individual files for download.
Download the Finished File
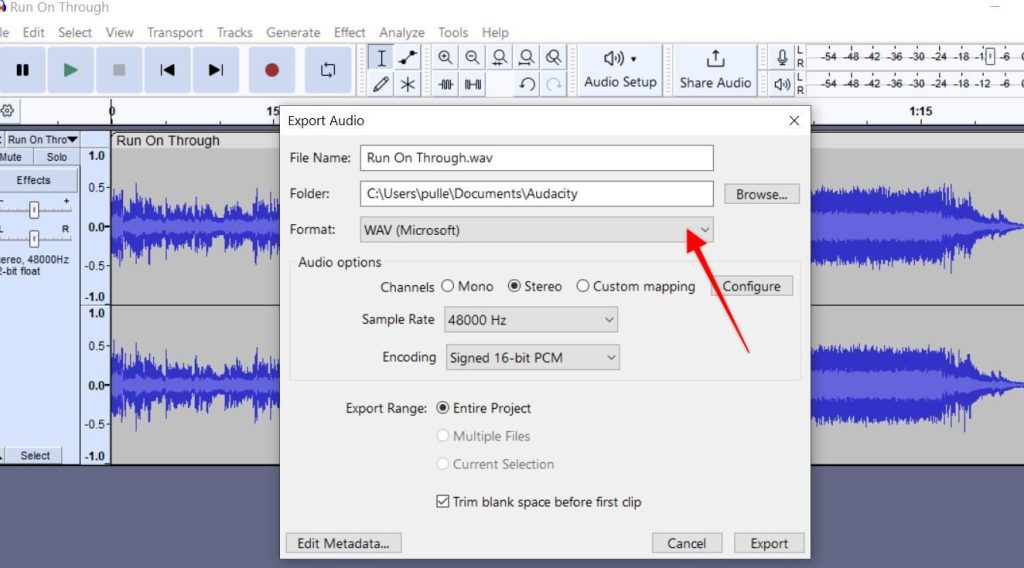
When you are ready to download the file, go to File > Export
You will notice you see a window giving you the option to save the files to a cloud service or to your computer. You will choose the computer option:
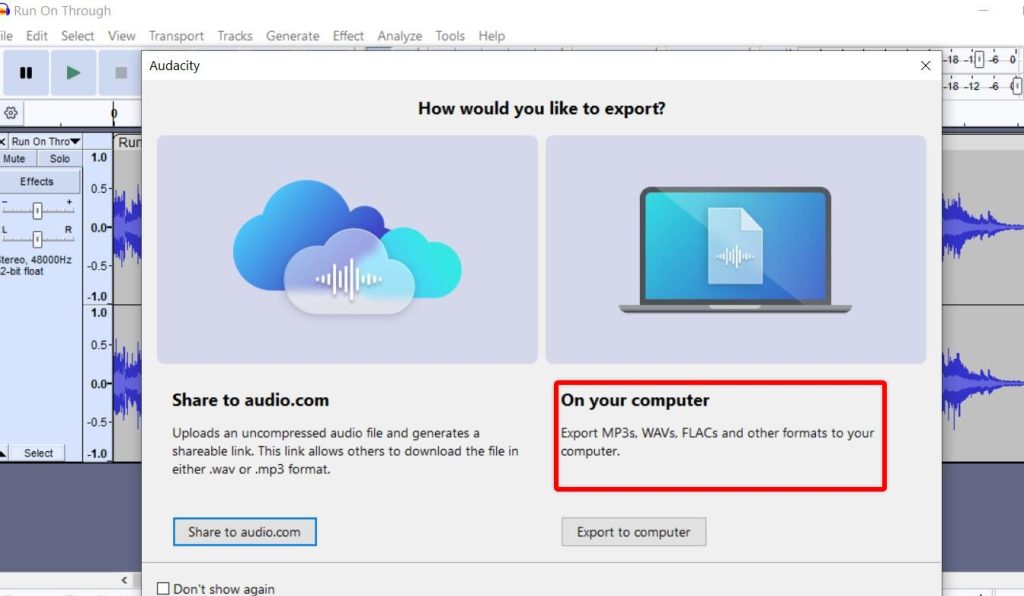
You will then be given the option of different file formats. For computer games, it’s best to download WAV format, unless you are advised otherwise.
Make a note of where the audio file is saved and you are ready to use it in your next game!